May 31, 2011

Tiramisù

_____________________________________________________________________________
This tiramisù was a big success! Although the recipe says it feeds 6-8, it's so rich and creamy we ended up getting about 10 serves out of it, probably more. It's one of those extremely decadent deserts which require 30 minutes of recovery time after eating.
_____________________________________________________________________________
Tiramisù

12 savoiardi biscuits (aka ladyfingers or sponge fingers)
500g mascarpone
250g crème fraîche
2 eggwhites
Cocoa, for dusting
Coffee Syrup:
200 ml long-black-strength coffee
50g caster sugar
50 ml brandy
25 ml amaretto
Zabaione:
2 egg yolks
60g caster sugar
25 ml marsala

1. For coffee syrup, stir coffee and sugar in a small saucepan over low heat until sugar dissolves (2-4 minutes). Add brandy and amaretto, stir to combine, then set aside to cool slightly (5-10 minutes).
2. Lay savoiardi on a deep tray, spoon over coffee syrup and set aside until absorbed (5-10 minutes).
3. Meanwhile, for zabaione, whisk yolks, sugar, marsala and 1 Tbsp water in a heatproof bowl over a saucepan of simmering water until pale and thick (around 5 minutes), set aside to cool.
4. Whisk mascarpone and crème fraîche to combine, then fold through zabaione. 
5. Whisk eggwhites in a separate bowl until soft peaks form, then fold through mascarpone mixture.
6. Lay half the soaked savoiardi in a 25cm-diameter serving dish, spread half the mascarpone mixture over and dust with cocoa, then repeat. Refrigerate for 2-4 hours for the flavours to develop, then serve dusted with extra cocoa. 

A few notes:
I'm not sure how big traditional savoiardi biscuits are, but I ended up using around 24 ladyfingers instead of the 12 recommended. Because I doubled the amount of biscuits, I also doubled the coffee syrup to go on them. Next time I make this recipe, I'll use a double quantity of biscuits again, because I think otherwise the mascarpone and crème fraîche would overpower the dish, but I'll only use 1 1/2 portions of the coffee syrup - my tiramisù ended up tasting quite alcoholic!


 _____________________________________________________________________________
Recipe taken from Australian Gourmet Traveller, May 2011 edition. 
 _____________________________________________________________________________


May 11, 2011

S'mores Brownies

 _____________________________________________________________________________
The first time I experienced S'mores in America I was a little underwhelmed, I just didn't know what to do with all the biscuit and chocolate and marshmallow, and I couldn't work out how to get it all successfully melted and in the same place at the same time. After making these brownies though, I understand what all the hype was about, they're damn tasty and much easier to eat all in one go without the complicating business of toasting them on a fire. 
_____________________________________________________________________________

S'mores Brownies*
(or marshmallow&biscuit brownies for the Australians)

1 1/2 cups plain flour
2 tsp baking powder
1 tsp salt
1 cup unsalted butter
170g (6 oz) dark chocolate, chopped
5 large eggs
1 1/4 cups dark brown sugar
1 cup granulated sugar
2 tsp vanilla essence 
1 cup Graham crackers, roughly crushed with your hands (I used Digestives)
12 big marshmallows (you can also dice some extra marshmallows and add them to the brownie mixture before cooking if you like)


Preheat oven to 180˚C. 
Butter 9 x 13-inch baking pan with 2-inch high sides. Combine flour, baking powder and salt in a small bowl. Stir butter and chocolate in a medium sized bowl over a heavy saucepan of simmering water. Stir constantly until melted and smooth. 


Beat eggs, sugar and vanilla in a large bowl to blend. Stir in warm chocolate mixture, then stir in the dry ingredients. Fold in the Graham crackers/Digestive biscuits. Pour the batter into your prepared tin. Dot the top with 12 (or so) large marshmallows. Bake about 30-40 minutes, or until a toothpick inserted into the centre comes out with moist crumbs attached.


The marshmallows start out brown and puffy but deflate as the brownies cool. Let cool for at least 20 minutes, then slice with a sharp knife. Eat!
_____________________________________________________________________________
* This is another recipe borrowed from Joy the Baker, whose blog you can find here
_____________________________________________________________________________

The Black and White Cookie


 _____________________________________________________________________________
"Oh look Elaine, the black and white cookie. I love the black and white. Two races of flavor living side by side. It's a wonderful thing isn't it?"
- Jerry Seinfeld

...I love the black and white cookie too! This one in particular:
_____________________________________________________________________________


Black & White Cookie*
Cookies:
2 1/2 cups plain flour
1 tsp baking soda
1 tsp salt
2/3 cup buttermilk (shaken)
1 tsp vanilla essence
2/3 cup unsalted butter, softened
1 cup granulated sugar
2 large eggs

Vanilla Glaze:
2 cups icing sugar
1 tsp light corn syrup
1/2 tsp vanilla essence
2 Tbsp hot water

Chocolate Glaze:
4 ounces dark chocolate
3 Tbsp butter
1 Tbsp light corn syrup

Preheat oven to 180˚C.

Whisk the flour, baking soda and salt together in a bowl. Mix the buttermilk and vanilla together in a cup.  

Beat the butter and sugar in a large bowl with an electric mixer until they appear pale and fluffy, then add eggs and beat until well combined. Add the flour and buttermilk mixtures alternately in small batches at a low speed. Mix until smooth.

Spoon 1/4 cups of batter about 2 inches apart onto a large baking sheet. Bake in the middle of the oven until the tops of the biscuits are puffed and golden and spring back when touched - about 15-17 minutes. Transfer onto a rack to cool. 

To make the glazes:
Vanilla glaze: Whisk together all ingredients until smooth.
Chocolate glaze: Melt the butter and chocolate in the microwave for around 1 minute. Add the corn syrup and stir until smooth.

Once cookies have cooled, turn them bottom side up. Cover half of the cookie with the chocolate glaze, and half with the vanilla. Refrigerate for 20 minutes to set.

A few notes:
- When I made the first batch of these cookies, they ended up really puffy and didn't seem to spread out much in the oven, the second batch I thinned down with a little extra buttermilk and it worked much better. It also meant I ended up with lots more cookies than I would have done otherwise!
- Also - I got worried that the glazes were too thin to sit on the cookies, but my concerns were completely unfounded, they went on perfectly. The only thing I would do differently next time is I would cover all the cookies with the vanilla glaze first, and wait for it to set before adding the chocolate glaze to the other half. When I did both sides at the same time the chocolate glaze bled into the vanilla glaze and they didn't look quite as impeccably perfect as I'd hoped... but there's always next time!
 _____________________________________________________________________________
* Recipe with thanks to Joy the Baker, whose beautiful blog you can find here
 _____________________________________________________________________________

April 25, 2011

Pimm's Punch

Apologies for the hiatus! Hopefully a hearty punch will remedy the long absence of posts :)
_____________________________________________________________________________
Pimm's Fruit Punch
Pimm's Fruit Punch
1 part Pimm's 
1 part ginger beer
1 part lemonade
Strawberries, halved
Pineapple, diced
Oranges, peeled and sliced
Apples, thinly sliced
Raspberries


This isn't the traditional recipe for a Pimm's fruit punch, there's no cucumber and I haven't added specific quantities of ingredients because I just decided to use all the fruit we had in the fridge. It ended up tasting really nice, so I'd recommend keeping the quantities of Pimm's, ginger beer and lemonade the same, and mixing and matching with the fruit as you please. It's also nice to add some soda water if you prefer a punch that isn't as sweet, and mint tastes great in there too. 
_____________________________________________________________________________


February 11, 2011

The Best Blueberry Muffin Recipe

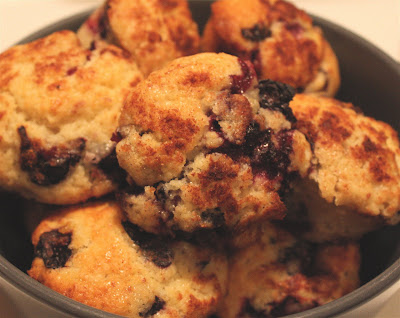
I know that is a big call, but blueberry muffins are my favourite and I have tried many recipes over the years. Four years ago I found this one and have not looked back! I think the secret is the partially mashed blueberries and the cinnamon sugar on top. This is from 1830 Admiral Quarters Inn B & B and can be found at www.bbonline.com.


Ingredients
2 1/2 cups blueberries (fresh or frozen)
1/2 cup butter
1 cup sugar
2 eggs
2 cups plain (all purpose) flour
2 teaspoons baking powder
1/2 teaspoon salt
1 teaspoon vanilla extract
1/2 cup milk
2 teaspoons sugar + 1 teaspoon cinnamon

Preheat oven to 375ºF (190ºC). Cream butter and sugar, then add eggs one at a time and blend. Add dry ingredients alternately with milk and vanilla. Mash half the blueberries, then add these and whole blueberries to the mixture. Grease muffin tin well. Pile mixture high in muffin tins and top with cinnamon sugar. Bake for 30 minutes. Delish!


January 31, 2011

Cinnamon Teacake

Today I made cinnamon teacakes! I'm not sure where I got the recipe from, but I've had it for ages and it's a delicious cake and really simple to make. It's pretty much just a normal, unambiguous, nothing-too-special cake...that is, until you take it out of the oven and swamp it with melted butter and cinnamon and sugar!!

_____________________________________________________________________________
Cinnamon Teacake:

Cinnamon Teacake:
Serves 8
80g. butter (at room temperature)
110g (1/2 cup) caster sugar
1 tsp vanilla essence
1 egg
150g (1 cup) self raising flour
80 ml (1/3 cup) milk


Topping:
20g butter (melted)
1 Tbsp sugar
1/2 tsp ground cinnamon


1. Preheat oven to 180C. Grease & line a 20 cm cake tin. 
2. Beat the butter, caster sugar and vanilla essence with an electric beater until pale and creamy. 
3. Add the egg and beat until well combined. Using a large metal spoon, stir in half the flour, then the milk, then the remaining flour.
4. Spoon mixture into tin and bake for 25 minutes or until golden and cooked through. Let sit for 5 minutes.
5. Turn the cake out onto a plate, brush it with the melted butter. Combine the sugar and cinnamon and sprinkle evenly over the cake. 
Then decorate!
_____________________________________________________________________________


January 19, 2011

Antipasto Tarts

I adapted these tarts from a recipe in some cook book or other years ago and they have been a great stand-by ever since. The real beauty of these is that generally I have all the ingredients in the house, so if I find myself at a loose end for dinner, I can whip these up without a trip to the store. And they are delicious too!

Ingredients
Frozen Puff pastry (each sheet makes two tarts)
Pesto - homemade or jarred (substitute any other sort of base you have handy - olive tapenade, a brush of olive oil sprinkled with herbs and/or garlic, tomato paste etc)
Toppings, any selection of the following - fresh tomato, fresh mushrooms, marinated artichoke, marinated red capsicum (peppers), olives, marinated eggplant, marinated mushrooms, sun-dried tomatoes etc
Feta cheese - marinated or fresh (I have also used goat's cheese with good results)

Defrost pastry sheets, then cut in half. I like to use kitchen scissors (you will find that I am very fond of using kitchen scissors for myriad purposes). Place each piece of pastry on a baking sheet covered in non-stick baking paper or lightly oiled aluminium foil. Fold in pastry edges creating a border of about 2 cms (3/4 inch).

Cover each pastry sheet with pesto. Chop/slice all topping ingredients. My personal preference is fresh sliced tomato and mushrooms, sliced olives and chopped marinated artichoke hearts. Top your tarts. Crumble cheese over the top. Put into a pre-heated 400F oven. Bake for about 20 mins, you want the pastry cooked, edges puffing up, but be careful not to burn the tops. I like to serve these with a crisp green salad in summer, steamed veggies in the winter. Tonight I served them with steamed green beans and wilted spinach. Enjoy!